
Social Media Advertising
Social network advertising, also social media targeting, is a group of terms that are used to describe forms of online advertising that focus on social networking services. One of the major benefits of this type of advertising is that advertisers can take advantage of the users’ demographic information and target their ads appropriately.
Social media targeting combines current targeting options (such as geographic based targeting, behavioral targeting, socio-psychographic targeting, etc.), to make detailed target group identification possible. With social media targeting, advertisements are distributed to users based on information gathered from target group profiles. When choosing where to place your ads, it’s also helpful to know which networks are most popular among which types of users. For example, Pinterest has far more female than male users, and Snapchat has massive penetration in the younger audience segments. This course will help you understand different platforms thoroughly and apply it accordingly. This course is divided into five modules;
How to use this handbook?
In this guide, you learn what is possible in several leading platforms and learn how to evaluate which platform is right for your message and your audience. On the next pages we cover five major social media platforms: Facebook, Instagram, Twitter, Whatsapp, and LinkedIn. Each of these sites has more than 100 million monthly active users.
For your clarity and understanding we have prepared these detailed notes with screenshots. We urge you to go through this after your classes and get in touch with our instructors whenever you need more information about any particular topic. We hope these notes serve you as guide in building a successful career in this field.
All the best for your future!

This is the age of Facebook or FB as we lovingly call it. Whenever we meet a new person or venture our first thought is to check them out on Facebook. Everyday people around the globe meet new people, spend money and make new investments through FB. The sheer number of Ads that are bombarded us through FB in just 24 hours is simply uncountable. A layman would never believe the layers of programming and algorithms that go behind the making of FB and that is exactly what we are going to learn through this module. In this module we look at how to create pages, advertisements, target those advertisement and achieve results in very detailed and insightful manner.
Logging In
Mostly every person will have a Facebook profile which is accessed through a login password and email. You cannot create Facebook page, group or community without a Facebook profile. Every profile can have one Ad account associated with it, however, you cannot run Facebook sponsored ads without a Facebook Page. To create the profile, follow this link
Press the signup button and you are good to go

If you already have an account, simply login to your account by using the login button on the top.

Once you are all signed in, your profile will look something like this

Updating Your Profile
In ‘About’ section you can add information about yourself, update your relationship status, and add your workplace, college, school and even your family members!
Here is a fun activity to do if you’re a new FB user. You can stalk all the photos ‘Liked’ by your loved ones! Go to your Search bar and simply type “Photos commented on by my husband/ girlfriend or simply the person’s name” and Voila!
Adding Friends, Liking and reacting to pictures, videos and stories shared by the people you are following, sending Direct Messages are all various other activities you can do on FB. These are all self-explanatory as you will find everything you need right on your profile page. As a new user, FB will prompt you about all the basic tasks you need to do.

Similarly, you could also try typing: “photos liked by me” (so that you can assess yourself)
Profile Privacy
Your profile security is of utmost importance, don’t take it lightly.
Always make sure to check this area

And log out of all the devices that you think you did not log inside with.
To perform this, go to your simply go to your settings, check the image below

After clicking settings, head to privacy. You can set your account according to the preferences below, if you are bit too much concerned about it. If you are a social person you can leave it all open to the public.

Exercise 1:
Create a Facebook Profile
Add few friends
Find all the photos like by a particular person in your friends list
Pages
Now we are all set to create the pages. Click on the create button and select page.

Pages can be created for a business or for a public figure or for a community

Let us take the case of Business or Brand here. You can only run Facebook sponsored ads if you own a page.
Fill in these details and voila you have already created a page.

Now we need to create a profile picture and cover picture. Profile Picture is an image with size 360 * 360 or a minimum of 180 * 180. For the brands it is usually their logo. For a personal profile a selfie will do just as good.

Cover picture is the image that spreads out horizontally on the top of the profile like a banner. The size of the image should be 851*315.

Creating Profile/Cover Pictures
To create a striking Profile Picture and Cover Picture for you brand/business you don’t need to have any genius photo editing experience. You can use the following online tools to achieve professional quality images;
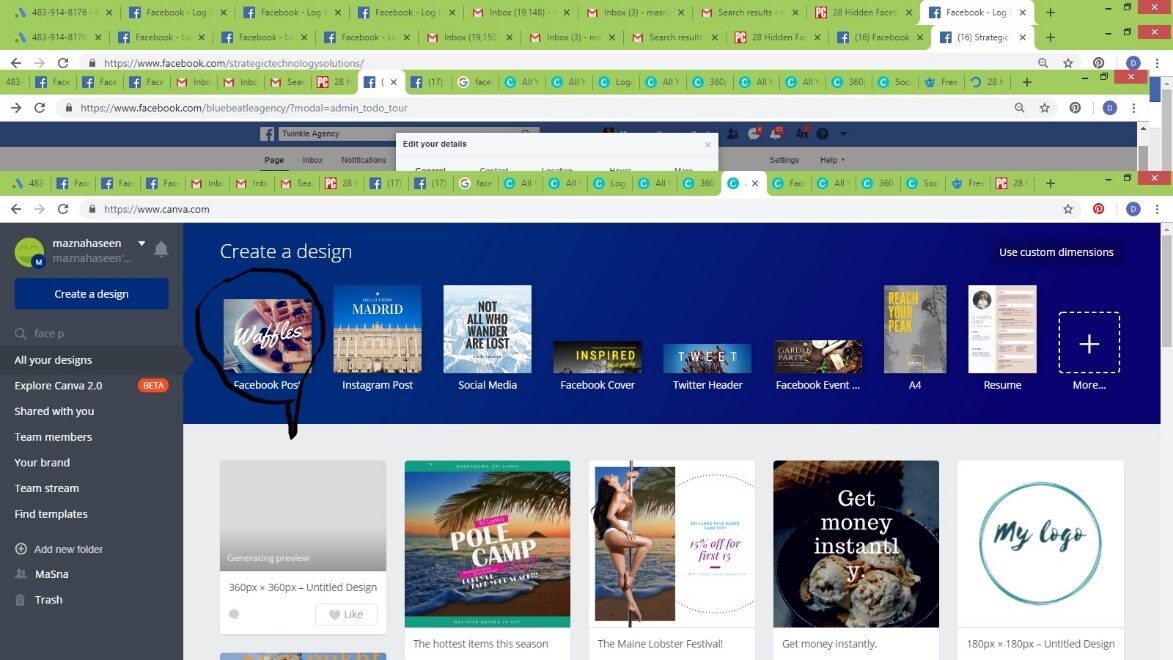
To create profile picture, register with canva.com. Click custom dimensions above and set dimensions in px as required

Upload your logo with transparent background that is in “.png” background into canva.

Click “upload your images” and select the logo file from your pc. Drag and drop your logo onto your plain white canvas.

Or you could also use custom backgrounds. The possibilities of using various Elements, Layouts and Templates are endless on this platform. Experiment with canva.

Now simply download and use the image.
What if your business or client do not have a logo? You can go ahead and create one with Canva easily.
Create Cover Picture
Select the option “create cover picture” in Canva and you do not have to set the size. You can use any free template or you can download free images from freepik.com and use as desired.
Facebook cover can also be a video. Almost all the company will have their corporate video, you can ask them to provide their corporate video. The video resolution must be 820 x 462 pixels and length must be anywhere between 20 – 90 seconds

Now let us create a user name for the page.
Refer to the attached image below:

Oops! page is all about blue Beatles, now let us go ahead and change the display name of the page.
Click on edit page info

Scrawl down and click

Then you are good to rename your page. It will take about 1-3 days for approval.

Fill in the rest of the details as well including email and website.
Exercise 2
- Create a Business or Brand page with category as advertising
- Add your website to the page or any sample website for practice
- Add profile picture and add a cover picture
- Create username for the page
- Add a button
- If you have a website, add the website as well
Creating & Scheduling Posts
Let us now create the posts as well as schedule them. To create the post, you can again use canva.com
After that go back to your Facebook page and make sure you are not posting it in your personal profile.
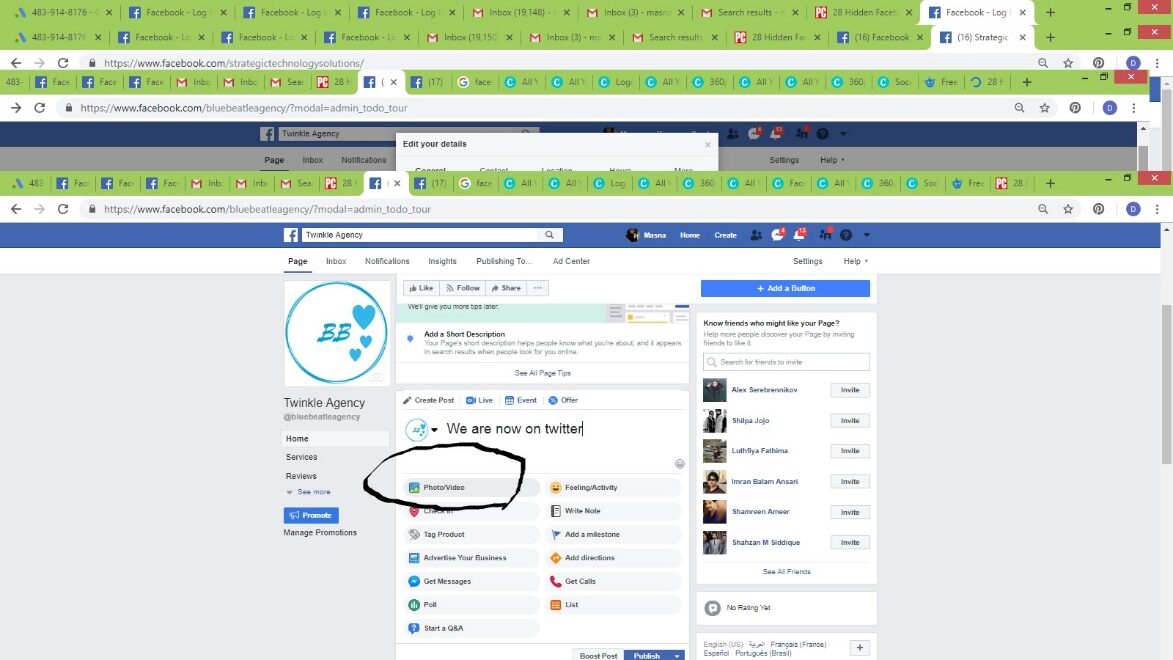
Type your description of the photo or video you’re going to upload and select the photo/video option. But don’t publish it not just yet. As a busy Digital Marketer you wouldn’t have time to come to your page often and make a post, instead you would pre plan all the post well in advance.
For example; let us say you need to create your posts about a month prior. The frequency of your posting is two posts per week. Now you can create and schedule your 16 posts for the coming month one by one.

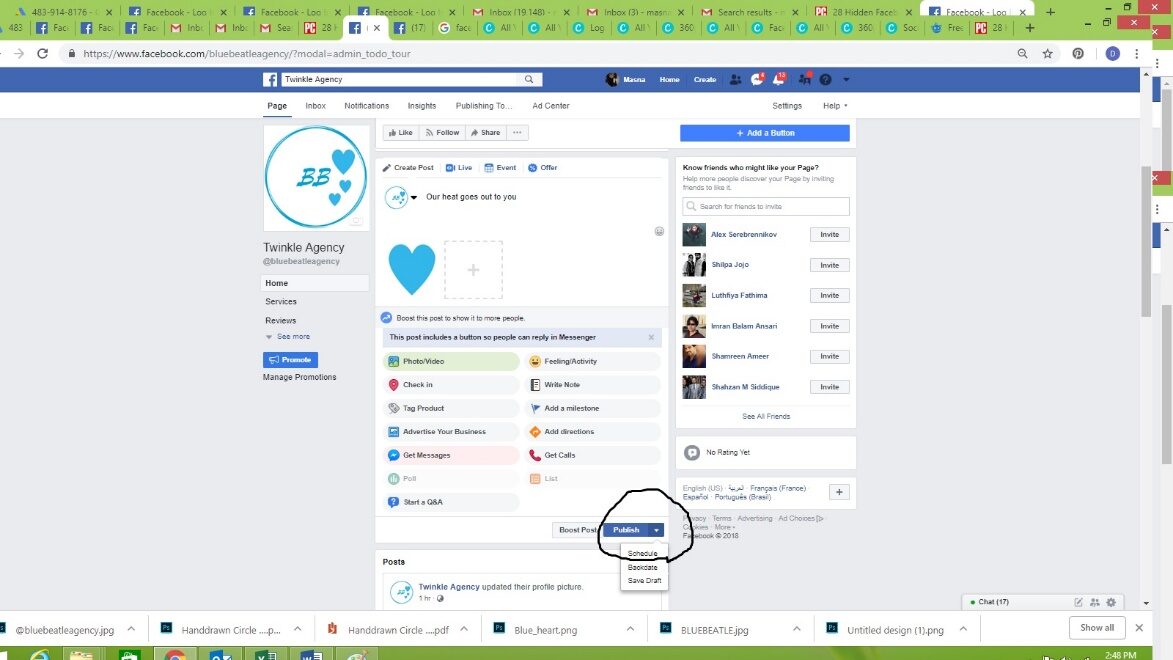
You can simply click the small drop- down arrow an option to schedule will appear, now you can simply schedule as desired.
The scheduling time can range from anywhere between 10 minutes to 6 months. This would mean that the following scenarios wouldn’t be possible
- You create the post at 11th August 2.54 and schedule it to 11th August 2.58, because it is less than 10 minutes
- You create a post on 11th August 2018 and schedule it to 11TH May 2019 as it is clearly more than 6 months
Now we can go ahead schedule 15 more posts in a similar fashion. And you can remain carefree as Facebook would automatically post it on your behalf.
Also make sure that this particular button is unchecked for now.
After publishing the posts, you can find them within publishing tools.

Under scheduled posts you can see all your scheduled post and date and time. You can select the posts to reschedule or delete it.

Upon clicking publish on a scheduled post, it will publish the post instantly. If you cancel the schedule, the post will disappear and automatically move to drafts. You can also click a particular post to edit it.

Exercise 3
- Schedule 16 posts for the whole of next month
- Delete two of the scheduled posts
- Change the Description of one your Posts
- Add an extra Image for one your Posts
Backdate
Due to various reasons you might miss to create and post certain content. Backdating helps to save you from such situations. This little button takes us back in time.
For instance, if your page is just a day old you can’t backdate beyond 4 days. For a page that is one year old you can backdate until for a year, if it is 4 years old, then you can backdate the post anytime between the times page was created 4 years ago to the current date.
To perform this just click on the backdate date option right below the schedule post option.

If you just created a page come back after few days to try this feature out.
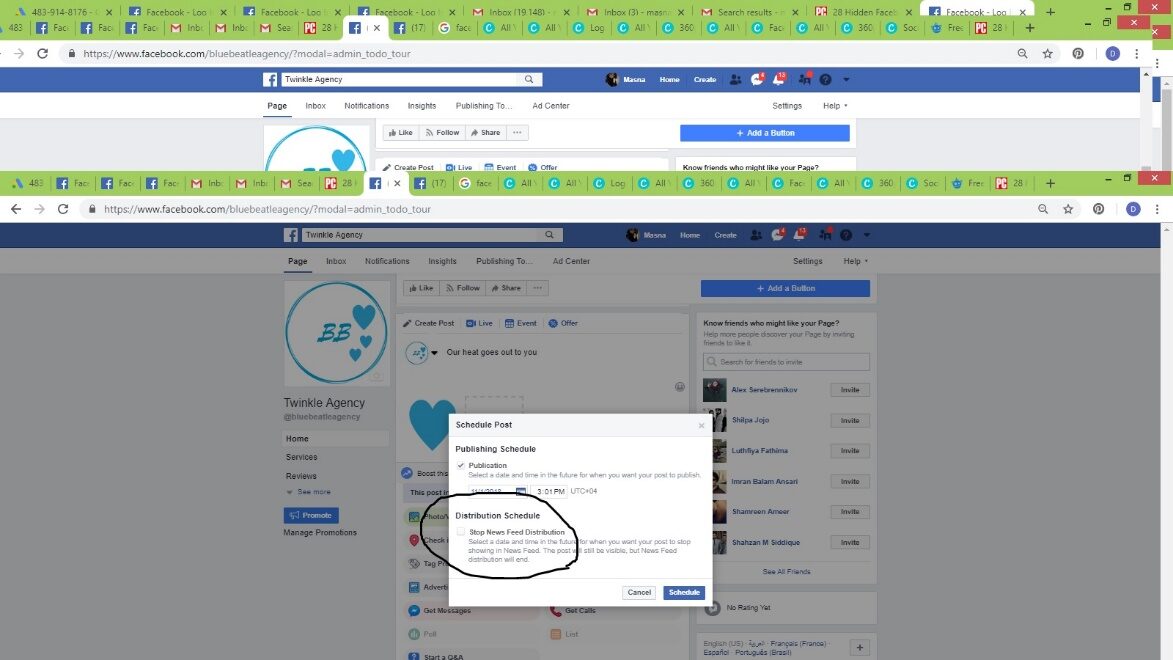
Distribution Schedule
When you want the content to appear on the timeline for only specific time and not after that you can use this option.
To do this, click on schedule and just click the box beneath.

Excersice 4
- Backdate a post
- Make your post available only from 12 PM to 4 PM on a particular day
- Cancel schedule of a post and find it in drafts
Creating Community Page
Community is just like a celebrity fan page but it is built around a cause or a common interest. For example you create a community page that is called “I love to eat “and connect with people who has interest in the topic. There can also be community pages that are not administered by a person, it is automatically created and maintained by Facebook.
Read more about Facebook auto created community pages:
“By the start of April 2010 Facebook announced auto generated community pages and by the mid of the month Facebook had already created about 6.5 million community pages. These were auto generated from Facebook users’ likes and interests profile section as well as work and education field of the users’ profile.
To create a Community page, click Create and fill up the required details. You may never use the name Facebook in any of the page titles.

Here is an example of community page

Now let us add buttons.
Click on add the button option, now that this is a page about a specific topic let us say your motive is to get more signups to your food blog.

Then choose the button

You can always delete an existing button and create new one

Advertising
Since most Facebook users log into the site every day and engage with other users, brands and content, the platform knows a lot about their users. For advertisers, Facebook is one of the most attractive online channels, because it lets them utilize their rich user-data to target very specific audiences. And since most companies and brands are already present on Facebook, ads are a great way to build a following and boost engagement for the content they share.
Let us go through the basic steps of Advertising by promoting the community page that we have just created.

Here is what you have to do 
Select the format, add an image, and the text and headline

Select;
- Your audience
- Select the age
- The location
- Add interests of your audience
- You can also choose to exclude certain people
And click save

Select a budget and duration and click promote
Exercise 5
- Create a community page
- Create a button signup
- Promote the button
- You can allocate just AED 20 to try it out for now.
What objectives can I meet with my Facebook ads?
You can optimize ads on Facebook based on what specific objective your campaign has. Generally, Facebook distinguishes three different kinds of objectives that follow the traditional user journey from awareness to conversion:
1. Raising awareness: This includes campaigns to raise brand awareness, local awareness and to maximize reach.
2. Consideration: These are ads that drive traffic to your website, boost the engagement of your posts, increase app downloads or video views and help you collect customer data (leads) to use in follow-up campaigns.
3. Conversion: These are ads that increase the conversion on your website or online shop, advertise specific products to users who have interacted with your shop before, or get people to visit your local store.
These campaign objectives require you to add a few lines of code to your website, which will then implement the Facebook pixel on your site. We will learn how to create a Facebook pixel and how to add it to the code of your website later in this course.
What targeting options does Facebook offer?
Facebook offers a variety of targeting options that you can combine to build a specific audience:
| Location | Target users by country, state, city, zip code, or the area around your physical business. |
| Demographics | Target users by age, gender, education, and the languages they speak. |
| Interests | Target users by interests, based on profile information, pages, groups or content they engage with. You can choose from hundreds of categories like sports, movies, music, games, or shopping. You can also target users who like specific pages. |
| Behaviors | Target users based on what Facebook knows about user behavior, such as the way they shop, the phone they use, or if they plan to buy a house or a car. |
| Connections | Target users who like your page or app and their friends. |
| Custom | Target existing customers based on data (e.g., emails, phone numbers) you provide. You can also create Lookalike Audiences – people who are similar to your existing customers. |
Some basic terms to understand:
- Reach:
Reach is the number of people who saw your ads at least once. Reach is different from impressions, which may include multiple views of your ads by the same people. There are three types of reach: organic, paid and viral. Understanding and measuring each of these is important to gauge how and why your audience changes over time.
Organic Reach – The number of unique people who saw your content in their News Feeds, tickers, or on your Page
Paid Reach – The number of unique people who saw your paid content
Viral Reach – The number of unique people who saw your post or Page mentioned in a Story published by a friend. These stories can include Likes, comments or sharing on your Page, answering a question or responding to an event.
- Impressions:
An impression is counted as the number of times an instance of an ad is on screen for the first time, regardless of people seeing it or not. (Example: If an ad is on screen and someone scrolls down, and then scrolls back up to the same ad, that counts as 1 impression. If an ad is on screen for someone 2 different times in a day, that counts as 2 impressions.) It can also be possible that nobody actually saw this ad.
- Frequency:
The average number of times each person saw your ad. This is calculated as impressions divided by reach. Data sampling is used here
- Add relevance score:
A rating from 1 to 10 estimates how well your target audience is responding to your ad. This score is shown after your ad receives more than 500 impressions.
This metric is very important; you must know how to optimize it in order for your ads to give optimal performance.
How Relevance is Calculated
Ads with relevance scores of 1 are estimated to be not very relevant to your audience. Ads with scores of 10 are estimated to be very relevant to your audience.
We base relevance scores on several factors, including:
- How well your ad is performing
- Positive feedback (ex: app installs, clicks, video views) we expect from people who see your ad
- Negative feedback (ex: Someone clicks “I don’t want to see this” on your ad)
Additional Metrics
CPM (Cost per mile) – Cost per thousand impressions
CTR (Click through rate) – clicks/impressions * 100
We are now ready to create ads:
You can simply click on this link to get started

We are going to create Ad that will bring us more page likes for a local nursery that is located in Al Barsha. For this, we have to be thorough with the hierarchy. A user can create an ad account, at account level you have the billing option and time zone setting. A user can manage up to 25 ad accounts. Under the ad account you have campaigns. Every account can have up to 5000 campaigns.

And then select page likes

Give your campaign a name. After giving your ad set a name, this name will appear in reporting. At ad set level you have audience targeting, budget, placement as well as scheduling.
Now select your page or create a new page.

Now we are going to describe the audience for your ad set.
Custom audience lets you select previously saved look alike audience or retargeting audiences. You can simply search for a previously created lookalike audience by name and add multiple previous creations. Look-alike audience will be covered later.

That is about custom audience creating new. You could also choose to exclude a custom or look alike audience.

You can use saved audience to choose audience that was previously created and saved through targeting or, you could simply target from the start. Let us simply ignore custom and saved audience for now and start targeting.
- First targeting field would be location and here are the possible options.
Let us keep it everyone in this location. Since it is a nursery, even if one of the parents is visiting the place for a while, he can drop off the child at the nursery as most nurseries also provide day care.

- Now that nursery is in Al Barsha, we would only want to target Barsha1, Barsha2 up to JLT at the maximum, since parents always opt for nearby nurseries.
- Parents of nursery kids are usually in the age group- 19- 43
- Gender, select all as a parent can be both women/men
- The language setting clearly depends on the language of your ad copy. If you are planning to write your advertisement in Arabic, select Arabic because English audience can’t read Arabic. If you are planning to write your advertisement in English, just leave the field empty, as in Dubai most of the people are English literates.
Here is the interesting part, now we will proceed with detailed targeting.
Click on browse and then click on demographics.

Under demographics you will see parents.

All parents wouldn’t be interested in a nursery. You just want to target the parents of new born, considering that the nursery also has baby care and toddlers. Just click on the arrow that says all parents

Now tick the following options
- New parents
- And preschoolers

Now we have completed 90% of targeting, go ahead and explore all the targeting options.
Let do the remaining 10% which is, setting the location. Within Barsha, we would want to target Barsha 1, Barsha 2, Barsha 3 and Damac properties, Dubai Marina and JLT.
Simply zoom inside the map and drop pins manually at these areas. Let us start with Damac Properties and Jlt. Now continue adding pins on the rest of the locations. Since they are nearby locations, make sure to set the radius to the minimum.

Now let us move on to connections.
The campaign’s sole objective is to bring us more page likes therefore; we will want to exclude people who like our Facebook page already. Why? Because they cannot like the page twice, if they click on the like button twice, it will become unlike.
So, let us go ahead and exclude them.

Moving towards placements we will just opt for automatic placement in this case. If we were to place ads for Facebook page likes elsewhere for instance on Instagram or audience network, people wouldn’t actually take the trouble to come from those platforms to Facebook to just like your page.

Setting budget
A daily budget between 50- 100 is good for a Facebook campaign.

If you choose daily budget you can set a start-date and end-date of the campaign but you won’t be able to schedule them. To schedule them you will have to switch to lifetime budget.
Lifetime budget is advised for month long campaigns and they deliver better than daily budgeted short campaigns.

A lifetime budget of 1500 is good for a month-long campaign.

Bid strategy
If you are strict on budget and do not wish to pay more than AED 1 for a like and after running your ads you see that you’re paying around AED 2. You can set this to AED 1. 
Setting this amount to a very low value will affect ad performance and delivery.
What is that you wish to pay for? Impressions or page likes?
Set it here.
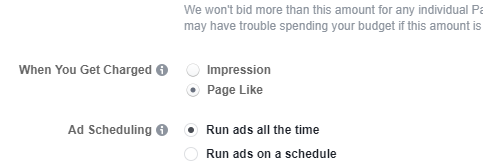
Ad Scheduling
Ad Scheduling lets you schedule ads for the desired hours in a particular day.

Delivery Type
You can select users’ time zone, this will save you from the ache of creating several ad accounts when you are running international ads.

Now select your delivery type. Keep in mind if you select delivery type as accelerated your budget can run out before the specified schedule.
After completing these steps, share the estimates that you receive from Facebook withyour clients. If they are good with it you can proceed.

Now click on continue

Selecting the Ad Creative
What Facebook ads look like?
Here you have four different choices – you can create an ad that features a single image, a single video, or multiple images that are displayed either in a carousel format or as a slideshow.

After you select one, you will automatically get the recommended resolutions for each.
You can create an image using Canva. If you do not have the patience to do that, you can ask Facebook for free Shutterstock images. Bonus point is they appear in the Ad without any watermark.You will be excited to know that you can create a video ad without any video editing experience.
To do this, click on single video option and scrawl down.
Now click on use template.


Now select and create as desired.
What more could you ask for?!
Now fill in as desired and click continue to publish the ad. Your ad will first go through the approval process. You will be notified once your ad is active.
Audience Types
To create different types of audiences, especially the ones that you use for remarketing are created using ads manager.
Go to ads manager. Under assets, go to audiences.

Basically, there are three types of audience that you can create:
- Custom audience
- Look alike audience
- Saved audience

Custom audience helps you create your remarketing list.
If you already have the list/ excel sheet of your customer base, simply click on the customer file option. Convert your file to .csv format before uploading, or you won’t be able to map your data.

You could also import from mail chimp directly.

Click on add customer from our own file then click on upload.
After uploading, ‘map’ your data. 
For example, the first column if you recognize it as first name, then select first name from the drop down selector. The fields that you do not wish to upload, for instance serial number, or column number, since it won’t make any sense to Facebook, just select do not upload.
After you have completed mapping your data just select upload and create.
It will show you a screen saying hashed upload.

And once the process completes, you will receive this screen, simply click on done and you’re good to use the audience once it is updated.

Updating custom audience will take time, anywhere between 10- 48 hours or sometimes even more depending upon your file size.

Once the audience will be updated the Availability will be shown as ready. Then you can go ahead and use this audience.
Now let us look into the option of importing data from mail chimp. It will require you to log in to mail chimp.

It will fetch the emailing lists that you have within your mailchimp account. You can select the lists (one or multiple) for which you would like to create an audience. A separate audience will be created with each list.

Select and then click on create audience.
It will take you to a screen where you can edit the names of each audience and you could also add description to it, which is strictly used for your understanding.

In this specific case, It says that your list will be ready in about 30 MINUTES but it purely depends on the size of your list.
Sometimes it will show the Availability as audience too small? Why? Just because there weren’t at least 20 phone numbers within the list that matched with existing Facebook users. In this case MailChimp imports must be an exception as most often we do not have phone numbers there.

Now when we speak of minimum limit is there a maximum limit? At a time, you can add only 10,000 people, but it’s okay! You can come back later and add the rest.
It also partially depends on the ad account; I have had an ad account with huge funds, where I could easily upload 180,000 at a time. But mostly it is just 10,000.
Remarketing
Again, to go ahead click on custom audience but now, select Website visitors.

But for this first you need to have your Facebook pixel installed which we will be covering in the following chapters. You can take the help of your developer for this.
Now you can select all website visitors and set the date and click on create audience. This enables you to serve your ads just to your website visitors who has visited your site already.
Want more niche?
How about giving a 5% discount to people who viewed your service/product page?
You can do just that, by using specific pages and type the unique phrase in your URL.

The drop down will also show specific events that you have created. We will talk about event creation at a later point of time.

From the above image, you can see that two events been created for my pixel. One is View Content and the other one is Page View.
If you would like to track people who add to your cart, you can create separate event for add to cart. And then show ads to just those people. Now give your audience a name and click create audience.
Look-Alike Audience
You can expand your audience list with this magical feature, it find similar people to the ones already present in your list. You can create a look alike audience from your Facebook page fans, or for any other custom audience that you have created.

Underneath audience simply click on Lookalike Audience and unravel the magic.

The source of a lookalike audience can be broadly classified into two:
- Value based sources
- Other sources
Under value based sources you have your Facebook pixel if it is installed, any product catalog you have created and offline event sets. Other sources would include any custom audience that you have created or a page that you admin.
Select your source, then add your locations, add the size of your audiences and click on create.
You can also select how many look alike audiences would you like to create.

And that’s how you get your estimates, is that not amazing?
Now the last option, saved audience is what we created with targeting using demographics, interests etc. during our first advertisement.
Facebook Pixel
Facebook Pixel is a way in which we allow Facebook to track our website activities so that we can later use them for advertising purposes. Basically, we insert a piece of code that is generated by Facebook on every page of our site that we wish to be tracked.
One business manager account can have up to 10 pixels. It is advised to dedicate a single pixel for a single website. But for one ad account you can only have one pixel. Many marketers share a single pixel with multiple website, but it is not recommend.
To create a pixel, go to your ads manager
Under Asset library just go to Measure and Report and then click on pixels. Now click on create pixels.

If you are developer, click on Manually Install the Code Yourself and if you are not, just click on Email Instructions to a Developer. Once you click on the second option a field will appear where you can simply entre your developer’s email address and then scrawl down and click on send.
Once your pixel is installed properly it will show active.

Create Events

There are 9 types of events that we can currently track. Turn the toggle on for the events you wish to track.
There are two ways in which we can track most of these events;
- Track event on page load
- Track event on inline action.
If you have a thank you page, that loads exclusively after purchase or form fills then you can opt for Track event on page load. If it is just about button clicks, then you will have to opt for event on inline action.

If you wish to associate a value for that particular action, that can be specified as well. Now simply paste the code on the particular page or button.
Lead form-based ad
For example, if you run a real estate business and you want a lot of form fills of potential leads. You can opt in for this option.

Before beginning with it, you will have to go through the terms and agree to it.

Now there is an optional field called as catalog. If you are an ecommerce website or if you simply happen to have a product/service catalog, travel package, flight rates etc., you have to first create the catalog (this will be covered in the following chapters) and then select it from the drop down menu.

After which you can create an audience, like we did for our first ad. If you already have a custom/ lookalike audience that you have previously created, under create new, custom audience, you can select the desired audience.

Now under Placements, remove the button from automatic and place on edit placements. You can now decide if you wish to show it to your Instagram users or not. Although, it is recommended that for this objective always go for automatic.

Now check the bid strategy here, it is different from the first ad that we have created.

It is advisable go with the lowest cost, unless there is huge difference between the amount you pay per lead and it is beginning to bother you. For example, for a lead you paid 25 and another lead you just paid 5. The lead you paid 25 was not worth it, but the other one was of more use to you. If this happens frequently then you might want to tell Facebook, the average cost per lead.
Now let us move to the creative part.
Here you can see an additional type of creative called as canvas (which will be discussed next). For now, you can opt for the traditional image/video ads.
After the creative there will be one additional step here and it is called the lead forms.

Click on + new form to create a form.
Form type you can keep it to more volume as these forms are easy to fill.

Now click on settings.
Here you can set the form language. Sharing you can keep open or restricted. Leaving it open will obviously bring you more form fills.

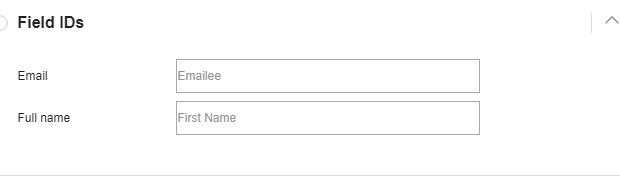
Enter your custom IDs. This will change the column names in the file you download with your leads.
When you’re finished changing the field IDs, complete the rest of your instant form and click Save to save your work or Finish if you’re done making changes to your form.
Now, any time you download your leads file, it will include the changes you’ve made to your field IDs.
Fill in the questions and click on finish on the top left right corner.

Now again here you will be asked to select the lead form and click on submit.
Carousel Ads
The carousel format lets you show 2 or more images and/or videos, headlines and links or calls to action in a single ad. Anyone who sees your ad can then scroll through the carousel cards by swiping on mobile phones or tablets or clicking the arrows on a computer screen.
Create a carousel ad
You can create ads in the carousel format from your Facebook Page or in Ads Manager.
Before you begin
- Check out the recommended image sizes and other relevant info in the Facebook Ads Guide.
- View examples of carousel format ads for creative inspiration.
- Create a mockup in Creative Hub and publish it later.
Create a carousel ad from your Page
- Click the Promote button on your Page.
- Choose Get More Website Visitors.
- In the upper right of the Ad Creative section, click Edit.
- Enter the URL you want people to be sent to when they click your ad.
Tip: If you want each carousel card to send people to a different URL, edit your ad in Ads Manager.
- Enter the Text of your ad.
- Under Images, click the button with the plus sign to add carousel cards.
- Click the number of the card you want to add an image to.
- Click Upload to add an image file from your computer, or Select Imageto add an image from the library of images you’ve previously uploaded while creating ads.
Note: If you need to crop an image, click Reposition Image to drag and drop the Crop Image tool onto the part of the image you want to show.
- Add a Headline for each card.
- In the upper right of the Ad Creative section, click Save.
- Fill out the Audience, Budget and Duration and Payment sections to complete the ad.
- Click Promote.
Create a carousel ad in Ads Manager
- Go to Ads Manager.
- Click the + Create button to open Guided Creation.
- Choose an objective that supports carousel. The only objectives you can’t use are engagement and video views.
- At the ad level, choose Carousel as your ad format.
- (Optional) If you don’t want your ad’s carousel cards ordered based on their performance, click to uncheck the box next to Automatically show the best performing cards first.
- Click
 to upload your image and fill in the details of the first card. You can also add specific URLs and descriptions for each image.
 - Repeat the step above with
 and
and  . Click
  if you want to add more cards or click Remove if you want to delete one.

- Click Confirm.
Groups
Groups have nothing to do with Facebook paid ads. Unlike Facebook pages, groups have members and members can post into the groups as themselves without posing as the group. We can add members to the groups that we create.
Creating a group.
Click on create and then select group

We can start by giving the group a name and adding some members onto the group

To add a person to the group he/she must be your friend on Facebook.
And we can wind up by selecting the group privacy option.

Currently, there are three privacy options;
- Public
Anyone can find this group; they can check all the group members and they can also see what the group members post
- Closed
Anyone can find the group, but they can’t see the list of members inside the group or the posts inside
- Secret
Only members of the group can find this group, view members inside and watch content of the group
Apart from the privacy options there are several group types.

How do you set your group type?

Under more, you will have an option to edit your group settings.
Exercise 6
- Create a Facebook private group
- Add a symbol alongside the name
- Change the group type to Learning
- Create a unit
- Create some posts inside the unit
Facebook Insights
Within the Facebook Insights data export, Like sources can be segmented even further. Dozens of sources exist; however, only the sources your Page was Liked from will appear in your data export. Facebook provides the following description for some of the most common Like Sources in its Insights developer documentation:

With the new Insights, you get new views and navigation. That means you can easily toggle between several specific views. You can check out a high-level overview of your results on one tab, and then easily navigate to other important metrics and KPIs with the click of your mouse.
![]()
All posts published
The Posts tab offers some great content analysis, complete with previews of visual content, reach and engagement stats. Of course, Facebook wouldn’t leave you high and dry without a way to capitalize on this insight through your ads budget. If you’re managing Facebook Ads, this is a great feature for you. It allows you to see your highest-performing content from an organic click-through perspective, so that you can quickly boost visibility of a post in your ad campaign.

People
The People tab gives a great demographic profile of your audience, including a benchmark of “All Facebook.” While this isn’t new, it gives you an interesting way to understand your fans. As you create personas of your ideal customer, content consumer, or audience member, tap into this info to build richer profiles.

Page and Tab Visits
This is our favorite part of the Insights section. Under the “Visits” tab in your handy new navigation bar, “Page and Tab Visits” allow you to see which of your tabs are being viewed. Why is this cool? If you’re promoting a photo-based campaign, or running a promotion in another tab, you can benchmark that against others on your Page. This allows you to optimize your content much like you would on your website.


Photo and video sharing site Pinterest lets users upload, save, sort, and organize images and videos, called pins, in personal and collaborative collections, called boards. The platform now reports 150 million monthly active users, who contribute to what the Pinterest CEO calls the “Catalogue of Ideas”. Many businesses, especially in the fashion, art or interior design space, have successfully used Pinterest to promote their products organically and have developed a following which engages with their content. Promoted Pins are Pinterest’s native advertising format – they look and behave the same way as regular Pins, but advertisers can pay to have them seen by more users.
Pinterest uses the concept of a notice board. Basically, you create a board and pin some posts inside. You can pin anything from the web, provided that the site you want to pin from allows pinning. There is no reason for them to not pin because they can get a lot of traffic from the pins. It is great place to get unique ideas; you could also get a lot of blueprints for free.

Simply visit:
https://www.pinterest.com/ and click signup.
Creating Account
And create an account
Initially the account would be personal; you can then convert it into a business account.
Your personal profile would look something like this:

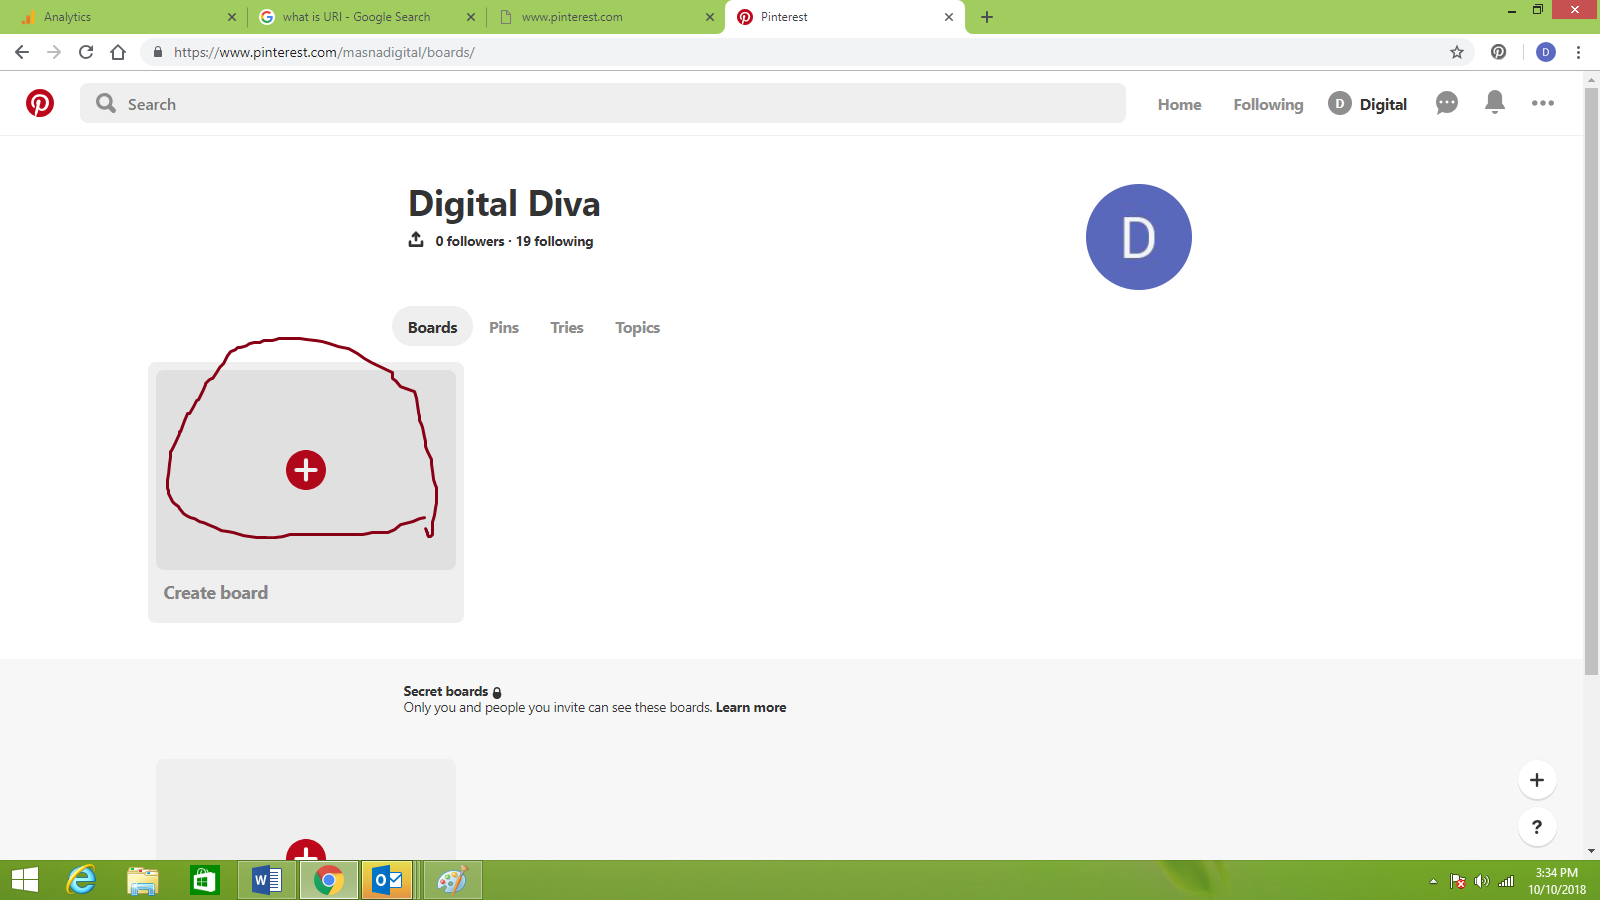
Click on your username to create both boards and pins.

We will first create a board and then add pins to it.
Let us say you are a fashion fanatic as well as a jigsaw junkie, you can club all your fashion related pins under the board fashion, and jigsaw puzzle related pins under a separate board named jigsaw.
A board can also be secret; meaning nobody else can see it
Now let us go ahead and create a pin and add it to the board fashion.
However fashion is such a broad category so we can create sections within the board like, one for dresses and another one for makeup.
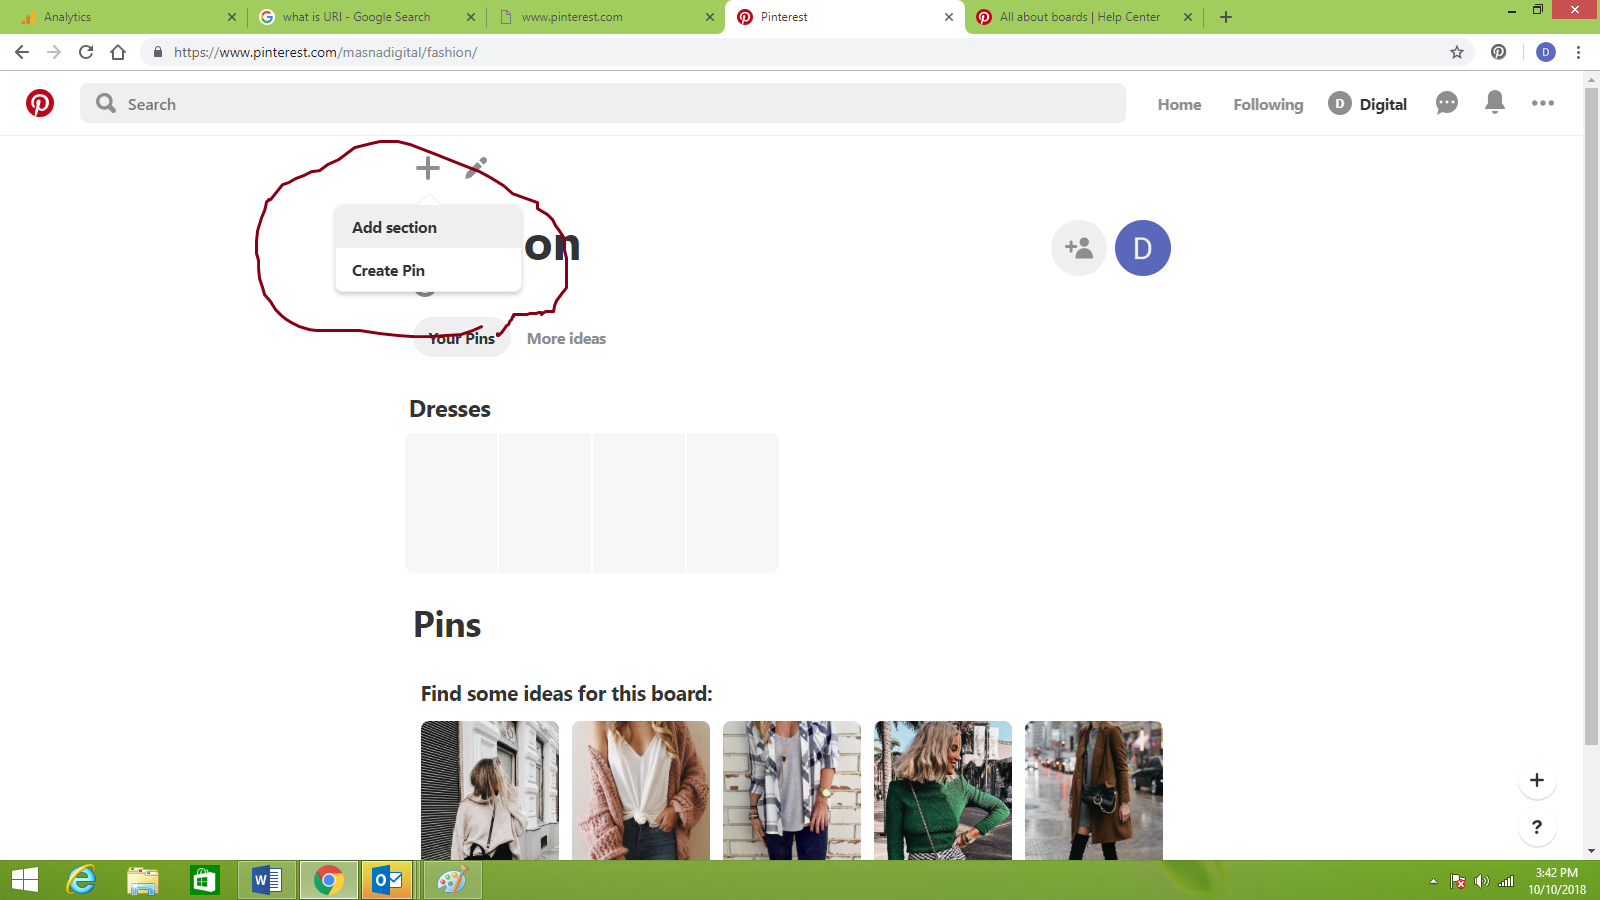
Now let us go ahead and create a pin

After you are done uploading a picture, putting up the link and writing a description click done. Then select the board and section to pin it.

If you do not wish to create a pin manually, you could simply click on more ideas and get ideas. Now go ahead pin any one of the suggestions that you like.

Now let us say, you have built your board already and it is quite impressive. Now we go about giving the board access to just your friends.

Here is how you invite a friend. A board can also have a cover picture and description.

You can always toggle the private button and make the board public.
Merging Boards
You can also merge one board with another by clicking the merge option. It will show you the following message;
“You’re about to move all the Pins from your Fashion board to a new section in your New board . When you delete Fashion, you’ll lose all followers of that board”
When would you use merge?
- When there are two boards for similar topics and one of the boards do not have significant number of followers.
- When your board is private for the purpose of only building content, and then you merge it to an existing board
You can create a test board for each section and merge them later. If you click on archive the board will be hidden from your profile and you won’t be able to add new content to it. There is another section called tries, whatever ideas you have tried or experienced you can go ahead and add here.

Converting to business account.
After you convert your account into a business account you could run ads and also get access to your page analytics.
But keep in mind that currently you can only run Pinterest ads in the following countries;
- Australia
- Canada
- Ireland
- New Zealand
- United States
- United Kingdom
Pinterest has a majority of female audience.
The Pinterest Tag
The Pinterest Tag is code on your site that helps you measure the effectiveness of your ads. The Pinterest Tag can also help you define specific audiences to retarget. If you’re thinking you want to measure certain events on your site then you’ll want to create the Pinterest Tag and set it up before you start running ads.
Track conversions beyond clicks
Saves and close ups are actions that are unique to Pinterest. They are strong signals of consideration and demonstrate the influence your ads can have.
Better understand your customer journey
Track cross-device actions and understand where engagement with your Pins took place—and where any related conversions took place. With the Pinterest Tag, you can track up to 9 different events and specify different attribution windows for conversion reporting. You can also export conversion reporting at the time of the ad event (default) versus conversion event, and get access to hourly conversion reporting

Creating a tag
Select ‘Conversion tracking’ in the Ads menu and click on ‘Generate tag.’ This generates the base code that should go on each page.
Additionally, you can add event codes to track specific events. Use the implementation guide to help guide pixel formatting. https://developers.pinterest.com/docs/adtools/conversion-tag/
• The base code must fire before any event code, so base codes should be placed in the of all web pages.
• Event code names need to match the exact spelling provided in the technical implementation guide— otherwise the events won’t be reported correctly.
• Pinterest Tag Helper: install the Chrome extension to verify that the tag was implemented and sending back the right information

Pinterest Analytics
To get to your profile analytics, click Your Pinterest profile at the top of Pinterest Analytics. Pinterest profile analytics gives you a look at how the Pins from your profile are doing. This includes all Pins you Pinned to your profile, and things you Pinned from your website or repinned from others. Remember to switch between views to see the Pins with the most impressions, repins or clicks.

See what’s trending
At the top of each analytics page there’s a graph that lets you see:
• How things are trending over time
• If changes to your Pinning strategy or website (like Pin It button placement) have affected your Pinterest activity
• If there are seasonal trends that map to activity on your profile
Change your view
Filter and sort your analytics to get a more detailed look at your analytics:
• Use the date picker to see data for specific time periods
• Sort your analytics by Impressions, Repins, Clicks and All-time
• Use the All apps menu to see analytics for different devices
Export your data
To save your data as a csv file, click Export data at the top of the page.
Export data to look at trends and ratios between impressions, repins and clicks. For example, it may help to see why a higher percentage of people are clicking one Pin over another.
Impressions
The number of times a Pin showed up in the Home Feed, search results and category feeds.
Repins
The number of times someone saved your Pin to one of their boards. Repins are how Pins are shared across Pinterest.
Clicks
The number of clicks to your website from Pins on your profile.
Pinterest Website Analytics
To get to your website analytics, click Activity from [website] at the top of Pinterest Analytics. This is where you can see how content from your website is doing on Pinterest. Website analytics shows data for all Pins that link back to your website, not just the Pins you’ve added to your own profile. Like profile analytics, you can sort website analytics by Impressions, Repins, Clicks and All-Time.
Audience Analytics
To get to your audience analytics, click your audience at the top of Pinterest Analytics. On this page you can find out more about the people (use the All audiences menu to limit your view to just your followers) who interact with your Pins.
Demographics & Interests
Knowing where your audience is from, what languages they speak and what gender they identify with can help you target your content better. For instance, if you see that a large portion of your audience speaks French, you may have some new marketing opportunities in France.
Of course, there’s more to a person than where they live or what language they speak. Here, you’ll get a deeper sense of the stuff that your audience tends to like. Interests – This is a look at the most popular categories (in no particular order) that your followers are into, so you can get more ideas about what kind of content your audience may like.
Boards – These are a collection of boards from your audience that contain many of your Pins. You can see how your audience organizes your stuff and thinks about your brand. Use this to see how your audience thinks about your Pins and get ideas for new ways to organize your boards and website.
Businesses – These are other business accounts that your audience engages with on Pinterest. Learning who else your audience is interested in hearing from can give you a clue about what else they’re interested in and what you might want to create in the future
Pinterest Ads
There are three ways to create and edit ads on Pinterest.

Selecting your campaign goals
Pinterest has a comprehensive suite of ad products to help advertisers reach their goals. In this section you’ll learn about what we offer and see how to create and manage your advertising to reach the right Pinners at the right time.
Goals
Your campaign objective determines how you bid in the auction and what ad formats are available to promote. Choose from the options listed here.

Ad Groups
Ad groups organize all your ads for a specific campaign so it is easier to control your budgets across ads and test different targeting options. Ad groups contain targeting, budget, bids and run dates.
1. Add your ad group details Here, you can name your ad group, specify flight dates and budget type. The budget type determines how your ad group is paced. If you select daily budget, we’ll aim to deliver that amount each day. If you select lifetime budget, we’ll aim to deliver the total budget by the end date you’ve specified.
2. Add Targeting Details
Here are the following targeting options:
• Audiences: find your customers on Pinterest via customer list targeting, retarget people who have visited your site or engaged with your Pins, or create actalikes from people who behave similarly.
• Interests: reach people based on their interests.
• Keywords: find people who are looking for specific ideas or products.
• Dynamic targeting: let Pinterest find people to reach based on the content of your Pin and what we know about users.
• Other targeting options: location, languages, device, and gender


Bulk Editor
Using bulk editor is a way for you to efficiently create and manage thousands of campaigns. You can download a CSV file, create new ads or edit existing ones, and upload the spreadsheet to implement all of your changes at once.
How to use bulk editor
To access bulk editor, go to the Ads dropdown and select ‘Bulk Editor’ or go to ads.pinterest.com/bulk_editor.
Get your bulk sheet template
You can download a sample sheet, or download your existing data by selecting ‘Download existing campaigns’. Select ‘Bulk sheet for editing or duplicating’ under your export options, for ‘Editing’ and ‘Selected rows’ Your file will begin downloading in the ‘Download’ tab of your History of Changes. All downloads within the last 24 hours will be tracked here. Make sure you click ‘Download results’ to view the bulk sheet.

Bulk sheets for specific sets
If you only want to download a subset of information—for example, you only want to make edits to 3 campaigns—you can specify which to download from the Ads Manager reporting interface.
Go to the interface, select the specific campaigns, ad groups, ad or keywords that you want to edit. Select ‘Bulk sheet for editing or duplicating’ under your export options and select for ‘Editing’ and ‘Selected rows’ in the modal.
If you only want to make changes to the campaigns or ad groups, you can choose to export the file without information for ads and keywords. This helps make the file a little easier to read.
Duplicating
If you have campaigns, ad groups or ads that are performing well and you want to clone them, you can select ‘Bulk sheet for editing or duplicating,’ for ‘Duplicating’ and ‘Selected rows’.
The bulk sheet will automatically build out new copies of what you selected and specify a ‘Create’ action. All you need to do is update the name and specify any other changes (to dates, bids, budgets, etc) and upload the file.
Whether you are downloading a sheet to edit or duplicate, you’ll find your file under ‘Downloads’ in your History of Changes


Measuring your performance
You can create and download different reports to help you understand how your ads are performing.
Reading your data
In Ads Manager, you can use the graphs and metrics in the table to measure your performance or you can export data to view in an Excel workbook.
• Use the graph in Ads Manager to view performance over time and learn how different metrics affect each other.
• Use a reporting preset, or create a custom view, to see different metrics in Ads Manager and optimize quickly inline.
• Export the metrics that are most important to you and view the data in an Excel workbook.

Data available in Ads Manager
There are different views of data in Ads Manager: delivery metrics, conversion metrics and a view of delivery and performance by targeting criteria.
Delivery metrics

If you want to see delivery metrics, including a breakout of paid and earned metrics, use the delivery preset or customize your own view to see data in the interface. This view can help you understand how you’re pacing against your budget and helps you understand the earned impact or your ads. Export this data into a spreadsheet if you want to work offline.
Conversion metrics
If you want to see conversion metrics from the Pinterest Tag, use the performance preset or customize your own view to see data in Ads Manager. The performance preset helps you understand how your campaigns are performing and includes information from certain events tracked by the Pinterest Tag. You can export the data from the interface or customize your export from the conversion tracking dashboard.
Delivery & performance by different targeting criteria

If you want to see delivery and performance by different targeting criteria then use the ‘Targeting breakdown’ options at the ad group and ad level. This can help you identify trends across your target audience, and help you identify which targeting subsets are performing the best. You can see breakdowns by Gender, Location, Interests, Keywords, Device.
Customize conversion settings
You can customize the conversion settings by clicking on the tool icon next to conversion settings and selecting the parameters you want to see.
Variable attribution windows and additional event types are available only with the Pinterest Tag. We recommend an attribution window of 30/30/1 or longer.
Here you can also select reporting on conversions at the time of the conversion event or at the time of the ad event.


Exporting your ads data
You can export different reports in the Ads Manager. The available exports will depend on what you’re viewing (objective, campaign, ad group or ad).
Current table view – Export the exact view you see displayed on the screen. This view is available across all entities.
• Select timeframe, reporting preset, conversion settings and targeting breakdown in the reporting tool.
• Get data aggregated over the timeframe.
• You can export from the delivery and performance presets, as well as export your custom view
Conversion tracking dashboard – You can also export comprehensive conversion reporting across different objective types. Select ‘conversion tracking’ in the Ads dropdown and click on ‘Export data’ under the reporting section. Here, you can:
• Specify objective types, conversion types, conversion settings and timeframe
• Get data by day, by Promoted Pin over the specific timeframe
• You can export CPA and ROAS summaries, detailed daily reporting, aggregated cross-device reporting by conversion type, as well as daily device reporting.

Twitter, also known as the “SMS of the Internet”, was founded in 2006 and now has more than 300 million registered monthly active users who post and read messages with up to 280 characters. Users can add links, photos and videos to their tweets, include hashtags to help others find their message, and run polls within a tweet. For advertisers, Twitter offers a variety of ad types that can be tailored to different campaign objectives, from increasing website visits and sales to creating a bigger following for a company’s Twitter account. Twitter also offers rich options to target a specific audience, including demographic, interest and behavior targeting.
Creating Account
To create an account simply visit the above link
And simply click on signup

It is better to log in to your existing account as new accounts won’t be allowed to create ads. Unlike Facebook and Pinterest, twitter has a strict character limit on tweets. A tweet is nothing but technically a post on twitter. At the moment is 280 but earlier it was only 140. To create a tweet just start typing on the section that says what’s new.

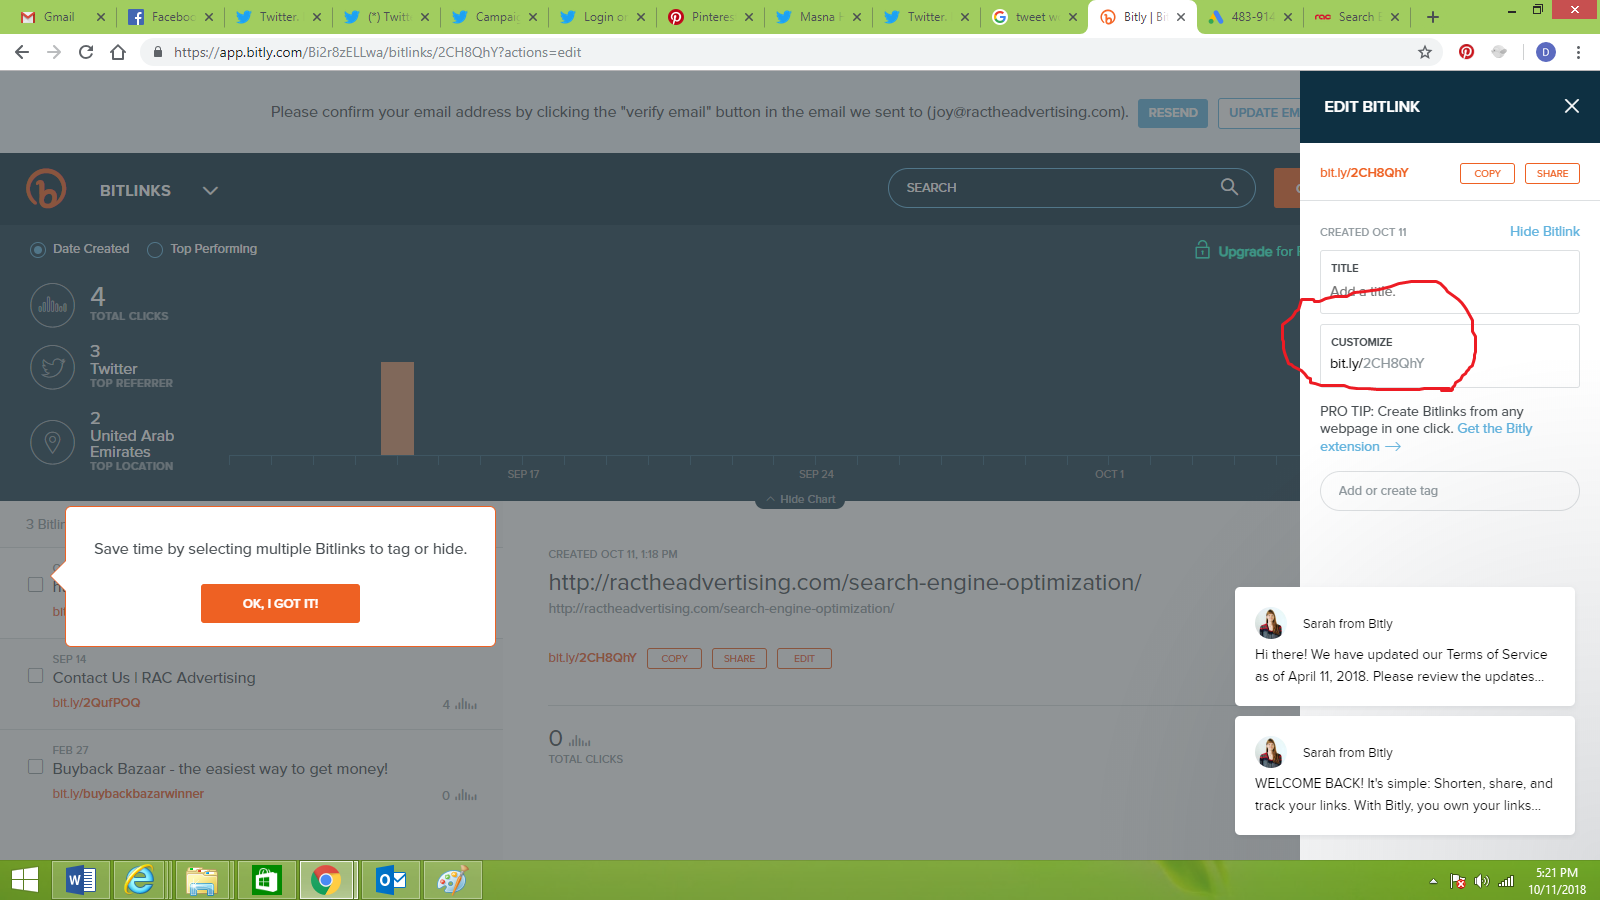
If you are posting a link in your tweet you might want to use a URL shortener, a good tool for this would be:
https://app.bitly.com/Bi2r8zELLwa/bitlinks/2QufPOQ
This app will not only shorten your link but will also give you an idea about, how many clicks you got for that link.
Let us shorten a URL using bitly:

Copy your long link

And paste it onto the tool; it will now give you a shorter link
What is a twitter handle?
A twitter handle/username is a unique identifier for each twitter account, unlike twitter names. Twitter usernames can be shared by any number of users.
Let us go ahead and set your twitter handle, just click on the settings

Now go ahead claim your desired handle 
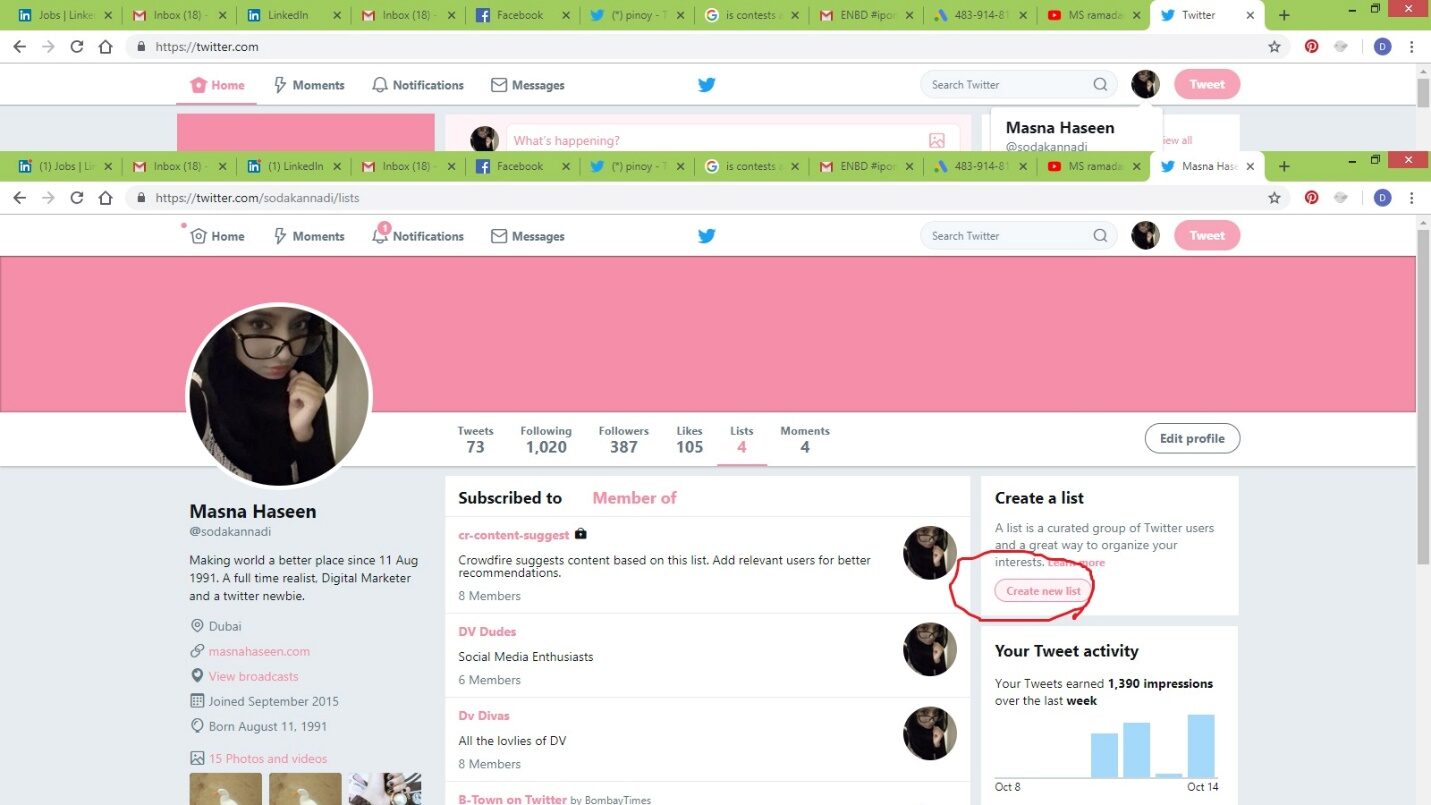
What are twitter lists?
As you follow more and more people your feeds can become very cluttered. So if you want refinement, you can create lists. For example if you follow a lot of Bollywood, Hollywood and Tollywood celebrities, you can create one list for Bollywood and add all the Bollywood celebrities inside and do the same with Hollywood and Tollywood. Now if you want to see feeds about just Bollywood you can simply go to the Bollywood list that you created.
Remember nobody can add anything to the list as such, a list will simply fetch the feeds of the members whom you have added to the list.

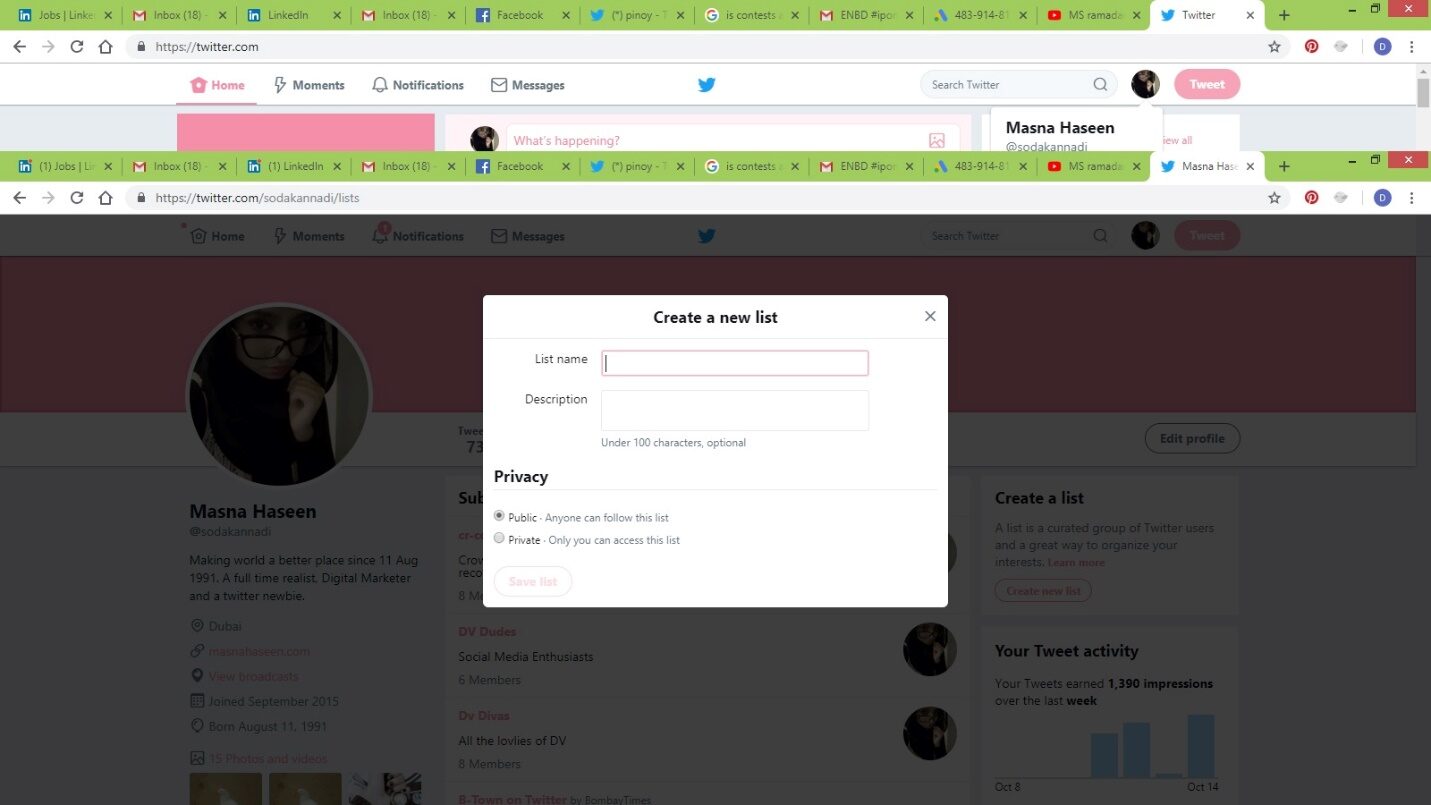
Create new list
There are two new list types: – Private and Public
- Public – Anybody can follow the list
- Private – Only you can access the list
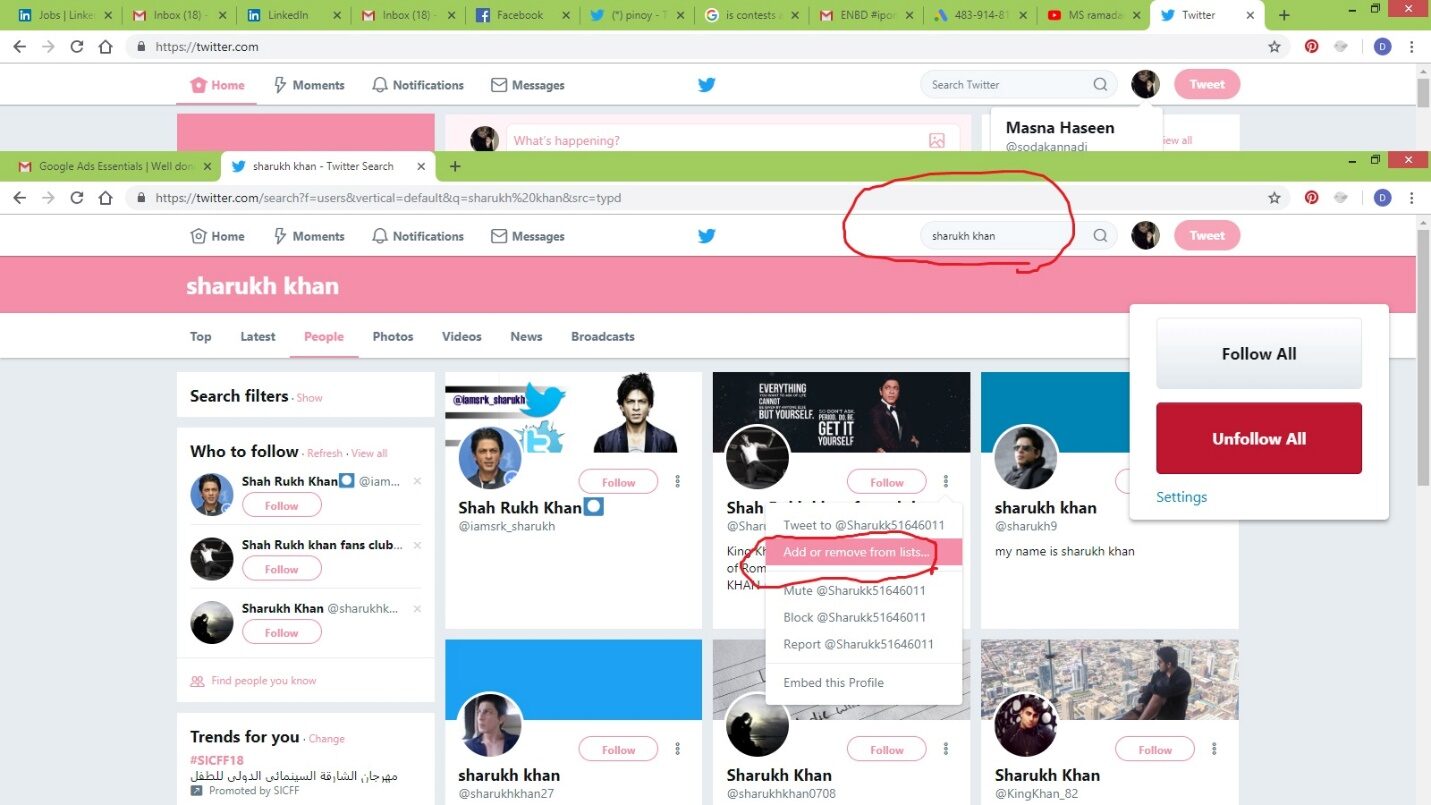
Now let us start adding people to this list.
Search for people and add them to the list, you need not follow them in order to be adding them to the list.
How to remove people from your list?
Just open your list, click on members then click on the member you wish to remove.

Just uncheck the list, from which you would want to save the member from and close it.

How to remove yourself from a list?
You can temporarily block the person. This would remove you from all the lists that particular person added you to and not just that specific list. If you wish to stay in other lists but be removed from just one list, you will have to request the person.
Chirrapp & Bitly
Chirrapp and Bitly are tools used to shorten the url since Twitter posts are character limited.


LinkedIn is the largest professional social network in the world with more than 460 million registered accounts. Of these, about 106 million users visit the site at least once a month. In addition to allowing users to connect with each other and search for business contacts, LinkedIn offers group features, company pages, and job listings. They also have a publishing platform on which invited thought leaders, influencers, and all other registered users can publish posts.
From an advertising standpoint, LinkedIn can be a great platform for two purposes: To
Promote employers, their jobs and stories, and to advertise products and services that are of interest to a professional audience
Before we move forward, here is an assignment to complete.
Create your LinkedIn profile
If you already have one, make sure that is an all-star account. Do not worry if you are not yet an all-star, just follow along the guided steps LinkedIn will take you through.
It should look like this:

What is this all star?
It is nothing but your profile strength.
There are five levels:
- Beginner
- Intermediate
- Advanced
- Expert
- All Star

Can anybody else see your profile strength level?
Earlier they could, now they can’t. It is only visible to you. Also, it helps to get you discovered on LinkedIn. That is one major advantage, so that people can add you and you can grow your network.
Getting an all-star with these few steps
- Adding a profile photo
- Listing 2 or more positions you’ve held, along with descriptions of your roles
- Getting a few recommendations
- Having 5 or more skills on your profile
- Writing a summary about yourself
- Filling out your industry and postal/zip code
- Adding where you went to school
- Having 50 or more connections
LinkedIn Connection Types
LinkedIn calls it degrees of connection. On LinkedIn, people in your network are called connections. Your network is made up of your 1st-degree, 2nd-degree, and 3rd-degree connections, as well as fellow members of your LinkedIn groups. You can build your network by sending invitations to connect with other LinkedIn members and your email contacts, or by accepting invites from others. The degree of connection you have with another member affects how you can interact with them on LinkedIn.
1st-degree connections – People you’re directly connected to because you’ve accepted their invitation to connect, or they’ve accepted your invitation. You’ll see a 1st degree icon next to their name in search results and on their profile. You can contact them by sending a message on LinkedIn.
2nd-degree connections – People who are connected to your 1st-degree connections. You’ll see a 2nd degree icon next to their name in search results and on their profile. You can send them an invitation by clicking the Connect button on their profile page, or by contacting them through an InMail.
3rd-degree connections – People who are connected to your 2nd-degree connections. You’ll see a 3rd degree icon next to their name in search results and on their profile.
- If their full first and last names are displayed, you can send them an invitation by clicking Connect.
- If only the first letter of their last name is displayed, clicking Connect isn’t an option but you can contact them through an InMail.
Fellow members of your LinkedIn Groups – People who are considered part of your network because you are members of the same group. The Highlights section of a member profile displays the groups you’re both a part of. You can contact them by sending a message on LinkedIn or directly through the group.
LinkedIn Member (Out of Network) – LinkedIn members who fall outside the categories listed above. You can’t contact them through an InMail, however you can add them to your network by send a personalized invitation to connect.
What is LinkedIn In Mail?
InMail messages are sent directly to another LinkedIn member you’re not connected to. If you have a Basic (free) account, you must upgrade to a premium account to use InMail.
You receive a specific number of InMail credits based on your subscription type. You can find the number of available InMail credits in the top section of your manage your account page.
What ad types does LinkedIn offer?
LinkedIn offers two types of ads
- Sponsored Content
- Text Ads.
These ad types can be booked via LinkedIn’s self-service platform, called Campaign Manager. In addition, larger advertisers can book display ads and promotional messages, called Sponsored InMail, via the LinkedIn Ad Sales team.
Sponsored Content Ad allows you to publish a promotional update on users’ newsfeeds, alongside all the updates from their regular connections. The update is marked as ‘Sponsored,’ but other than that it looks and behaves exactly like a normal update. Your update can include an image, video, infographic, PDF, SlideShare or link to a blog post or landing page. To set up a Sponsored Content Ad, you need to have access to a Company Page or a Showcase Page, or create a new one. Your content will be shared in the name of this company or brand. With a click on the user name or icon, people can visit the respective page and follow your updates. Your Sponsored Content Ad can either promote an existing update from your page or an update you create specifically for your campaign.
Text Ads are traditional ads that appear in the right column of the desktop and in other locations on their website. A Text Ad consists of a small image (50×50 pixels), a short headline (25 characters), a description (75 characters) and a link to your landing page or LinkedIn Company Page.
LinkedIn Dynamic Ads
LinkedIn Dynamic Ads allow you to precisely target decision-makers and influencers with highly relevant and customizable creatives on LinkedIn.
Drive quality engagement, traffic to your website or LinkedIn Company Page, and leads through deeply differentiated and personalized creative formats.
Build relationships and prompt the right people to engage with your ads through customized calls to action.
Reach the right prospects using accurate targeting based on the professional member profile
Why LinkedIn Dynamic Ads?
Drive engagement, prompt action, and build relationships with the professional audiences that matter most using personalized ads that resonate.
Target the audiences that matter. Select the audiences you want to reach based on a wide range of professional targeting criteria including company, skills, interests, and more.
Personalize your message and creative. Craft your ad copy, choose your call to action (CTA), and leverage dynamically generated images from LinkedIn member profiles.
Measure your performance. Analyze campaign-reporting metrics provided by your LinkedIn account team and fine-tune your ads.
Grow your company follower count. Build relationships and grow your company’s LinkedIn follower count using unique ad formats and “Follow” CTAs.
How to get started with Dynamic Ads
1. Choose your campaign objective
Dynamic Ads allow you to leverage member profile data to tailor your ads to your target audience. Identify your key objective for each Dynamic Ads campaign. This will inform the type of Dynamic Ad you use, the content of your ad, and how you measure success.
Common objectives for Dynamic Ads include:
• Brand awareness and consideration (tell people about your brand)
• Website traffic and conversions (tell people about your product, service, or event)
• Lead generation (tell people more details in exchange for contact info)
Build Dynamic Ads based on your objective
Versatility means more ways to achieve your business goals. When you build a Dynamic Ad, you have multiple formats to choose from. By generating personalized ads for each member, you can acquire followers, drive traffic, and more through three formats of Dynamic Ads:
For brand awareness, choose:
• Follower ads to expand your audience and acquire more followers for your LinkedIn Company or Showcase Page.
• Spotlight ads to share thought leadership, best practices, insights, and valuable content with your target audience.
For traffic and conversions, choose spotlight ads to feature your product, service, event, webinar, and more with a clear call-to-action, and inspire your prospects to click through to your website or landing page.
For lead generation, choose content ads to generate leads automatically when members download your content. You can download your leads directly in Campaign Manager or send them to your marketing automation tool or CRM. Please note: Content ads are currently only available through a LinkedIn representative.
Create your Dynamic Ad campaign
Log in to Campaign Manager to create a campaign.
1. Select Dynamic Ads
2. Select the ad format
3. Build your ad

Founded in the year 2009, WhatsApp has revolutionized the concept of messaging services. Offering a rich set of features that include instant messaging and sharing, automatic contact addition, and Wi-Fi operations, WhatsApp alone has 500 million monthly active users. Purchased by Facebook for $19 billion dollars last year, WhatsApp has made it as the most discussed – about mobile app across the globe.
One of the greatest advantages, is this app does not interfere users with irrelevant ads – hence can prove to be an effective tool to promote your small business. In fact a lot of marketers include WhatsApp marketing as an essential component in their digital marketing mix. Let us tell you how;
Below are few WhatsApp features that will help anyone promote their small business, effectively.
Messaging
If you think WhatsApp is limited to only sending text messages, then you are still in the dark. Considered to be the quickest means to introduce new products, offers and promotions directly to relevant users, WhatsApp allows marketers to run promotions through visuals, mp3 audio also known as voice notes, and videos. You can also target relevant audience in large mass through WhatsApp broadcasts feature.
Profile picture
Visuals have proved to create an everlasting impression and through WhatsApp Profile Picture, marketers can promote their brand, latest product, new offer, the possibilities are endless. For example, an apparel store can put up its best selling products as a profile picture. Before you upload your next profile picture, ensure you come up with the one that would draw attention and encourage the audience to engage with your brand.
About Me
As a business, leaving your profile status as: Hey there! I am using WhatsApp (we can see that) or Available – will not help you divert audience. Instead, use the status space to get creative with short messages that can draw attention and increase curiosity amongst your audience. You can either announce your new offerings or be loud about your sales or promotional offers.
Status
You can also employ the disappearing pictures on a daily basis to promote your business there. One can share offers, discounts and break news about their businesses on the status section now. This works great when you employ an influencer to market your business through their WhatsApp profile.
Group targeting
Group targeting is the best way to segment and targets your customers. WhatsApp allows marketers an ability to create groups of similar interests and start discussions. This way you get better insights by other business owners adding them to group chat room that you create. Another advantage of this feature, there are more chances of your message to go viral when the participant shares the content with their friends.
Campaigns
WhatsApp allows marketers a platform to run campaigns. For e.g., you can encourage recipients to send images of them using your product, posing in front of your store billboards, etc. And, in return offer discount coupon codes that will make it easy for your small business acquire relevant contacts and grow your business.
With millions of people using WhatsApp, it is becoming an affordable, mass communication tool that small businesses can creatively and innovatively use. Offering the above features and new ones to roll-out in the near future, WhatsApp can surely be an effective tool to promote your small business.
Snapchat
Snapchat started out as visual instant messaging service and has now evolved into a combination of a multimedia messaging and content platform. Snapchat now has more than 200 million monthly active users, many of them Millennials. They exchange snaps and stories with their friends and access the media content provided by editorial partners.
Since 2015 advertisers can reach Snapchat’s users through different ad placements and sponsorships. The majority of advertising offerings is currently only available to bigger advertisers with considerable budgets. But one ad type, the On-Demand Geofilter, is bookable through self-service.
What ad types does Snapchat offer?
Most of Snapchat’s advertising options are targeted at large brands and companies, and can’t be booked through a self-service platform like the other options we have seen so far. Only Sponsored Geofilters are available through self-service, so keep that in mind when evaluating advertising channels.
Snapchat Discover
It’s not officially listed on the website, but brands can take over a publisher’s channel in the Discover section of the app. If you want to sponsor a Live Story (also a feature in the Discovery section), you can be expected to pay about $250,000.
Sponsored Lenses
Lenses are a very interactive format in which users engage with promotional elements that overlay a video user’s film of her/himself. Snapchat reports that the average user plays for 20 seconds with a Sponsored Lens, which can really help brand drive awareness.
Snap Ads
Snap Ads are 10-second vertical mobile video ads with the option to swipe up for more related content, such as another video, article, ad or mobile website. Snapchat says that five times more users swipe up on Snap Ads than click through on ads on comparable platforms. Pricing for Snap Ads depends on the details of the campaign, but can be as low as $1,000. Currently Snap Ads can only be booked through Snapchat’s Partners.
Sponsored Geofilters
This is the only advertising option you can book yourself online and with a small budget. Geofilters, however, are a very specific ad type that only suits some campaign objectives. Geofilters are pre-designed overlays such as frames, logos, images or text elements that Snapchat users can use to decorate their snaps if they are in a certain location. Companies and brands can purchase Geofilters for a specific location (between 20,000 and 5,000,000 square feet) to promote their product, services or event.
If your objective is to promote a store in a mall, a party on campus, a booth at a conference, or anything else that is of interest to Snapchat users in a specific location, Geofilters could be an interesting choice for you. You can also use Geofilters to create some entertainment for your friends or guests at a wedding, birthday or any other personal occasion. But if you want to target users in a whole city or country, or by specific interests or behaviors, this is probably not the right choice for you.
How to get started
- Go to https://www.snapchat.com/geofilters and log in with your Snapchat account information.
- The Geofilter creation tool walks you through the design process, helping you with customizable templates. Alternatively, design your personal Geofilter in your favorite image editing software (e.g., Adobe Photoshop) and upload your file (learn more here).
- Choose the dates (min. 1 hour, max. 30 days)
- Define the location of your Geofilter (currently only the US, UK and Canada): Enter the address closest to the area you want to advertise and draw a fence around your selected area. Your area must be between 20,000 and 5,000,000 square feet.
- Snapchat then quotes you a price and you can submit your order for approval.
- If you have any questions, have a look at the related section on the Snapchat Support site.

Using image sharing networks can get you access to certain demographics that are harder to reach on other networks. Studies suggest that 90% of people on Instagram are under 35 years old, and 68% of them are female. This makes it a good platform to advertise jewellery, fashion, and entertainment. A disproportionate amount of these have high income brackets.
Getting started on Instagram
To start using Instagram, you will need the app. There’s a version in both iOS and Android. The mobile app is used to upload, edit and share images – you cannot do this using a desktop PC or Mac. If you are using a desktop, you can view comment on and share content. Once you have downloaded the app, you need to register, then update your profile. You can make your profile private if you want to spend some time setting it up and populating before making it public. As with twitter accounts, you get a profile image and a short bio, in this case 150 characters. Your profile picture should be the same as your twitter and Facebook profile pictures to maintain consistency across social media platforms. Because Instagram is a relatively basic platform, you need to connect to your other social media accounts to get the best out of it. Go to profile tab > edit sharing settings then choose which networks you wish to connect to. Each time you upload a photo (or video) you can select which network to make the photo appear in.
Using Instagram for your business
Switching to Business Profile allows you to identify your profile as a business profile. Instagram’s Business Tools feature makes it easy for users to contact you, provides you with in-depth insights, and allows you to promote your content. Note: Your business must have a Facebook business page to switch to an Instagram business profile.

Instagram Analytics
Instagram doesn’t have a built-in, in-depth analytics platform like Facebook.
When you switch to a Business Account, you do gain access to some limited analytics, such as follower growth, impressions, reach, and engagement. Access these by clicking on the View Insights option below your uploaded images and videos.
You can also track Instagram impressions, spend, and engagement on ad campaigns through Facebook’s Ad Manager. While helpful, these metrics are limited to individual posts and campaigns.
Instagram Advertising
Instagram advertising offers a unique opportunity for brands to engage with their audience. Since Instagram ads appear in feeds like any other post, they aren’t as obvious or disruptive as typical ads. They provide a natural way to encourage users to learn more about your business or product.
How Create an Instagram Ad
If you’ve ever set up a Facebook ad, you know the drill — setting up Instagram ads is done through Facebook’s ad platform.
To create your ad, select a current Instagram post you’d like to boost or create a new one in Facebook Ad Manager. If you haven’t run ads through Facebook before, you’ll first need to set up an account. You’ll also need to claim your Instagram Business account to link it to your Facebook page.

To claim your Instagram account, go to your Business Manager and, on the left side of the page, hover over the menu to click Instagram Accounts. Then click on Claim Instagram Account. Add your account information and click Next.

Pick an objective and name your campaign. While Facebook offers many different choices, only a few include Instagram advertising as an option. To ensure you’re on the right track, pick from any of the following options:
- Brand Awareness
- Reach
- Traffic
- App Installs
- Engagement
- Video Views
- Conversions

Once you’ve selected your objective, you’ll be prompted to name your ad set. If you select the Traffic option, you’ll be prompted to select a destination for your traffic. Facebook lets you pick between a website and an application.
Next, target your ad with demographic and psychographic factors, such as age, gender, location, language, work, financial status, behaviors, and connections. You can also load previously-used custom audiences.
Select Edit Placements under the placements options and select Instagram under the available platforms. Don’t forget this step! Otherwise, your ad will only show up on Facebook. If you only want to run your ad on Instagram, make sure that no other placements are selected.

After you select Instagram as your placement, you’ll be asked to set the budget and schedule for your ad. Set a daily spend budget or a lifetime budget for the ad and indicate start and end dates for your campaign.
If you don’t set dates or a lifetime budget, your ad will run indefinitely on the daily budget you allocate. You can find more budget and scheduling options under the Advanced Options menu, which allows you to schedule your ad to run during certain hours of the day or set your ad to generate results as quickly as possible using the “Accelerated” delivery type. This option is useful for ads focused around timely events.
Next, set up your ad content. You can boost an existing post or upload new content to run as your ad. Instagram allows you to create Single Image or Video Ads, Carousel Ads, and Story Ads.
To maximize ad delivery, Facebook recommends using images that are at 600 x 600px for square format ads, 600 x 315px for landscape ads, and 600 x 750px for vertical ads. Facebook recommends limiting your text on the image or video thumbnail.
Once your ad creative is uploaded, place your order and start running your first Instagram ad campaign!


Also explore: Our full Advanced Digital Marketing Course includes Social Media Marketing, SEO, Google Ads, and more — KHDA-approved and available online across all UAE emirates.